VII. MEASURING VOLUMES
A. METRIC VOLUMES

The volume of anything refers to the space that it occupies. Nearly all of the volumes dealt with in a bioresearch laboratory are measured in metric units. A cube that measures 10 centimeters on each edge has a volume of 10 cm X 10 cm X 10 cm = 1000 cubic cm, or 1000 cc (Figure 1). This volume of liquid is one liter, abbreviated as 1L or frequently 1l. In this workbook, we will use the "l" designation for liter.
The volume of a cube that measures 1 centimeter (1cm) on each edge is 1cm X 1cm X 1cm = 1 cubic cm, or 1 cc. This volume of liquid is one milliliter (Figure 1), abbreviated as 1ml.
The prefix "milli" in "milliliter" means one one-thousandth, or 1/1000, as it does in "milligram". Thus, one milliliter is 1/1000 of one liter, and there are 1000 milliliters in one liter. This can be seen readily in Figure 1.
The volume of a cube that measures 1 millimeter (1 mm) on each edge is 1 mm X 1 mm X 1 mm = 1 cubic mm. Since 1 cm = 10 mm, a cube that is 1 cm long on each edge is 10mm long on each edge (Fig. 3). Its volume, in terms of millimeters, is 10 mm X 10 mm X 10 mm = 1000 mm3. Thus, one cubic centimeter (1cc) contains 1000 cubic millimeters (Figure 1).
A cube that is 10 cm on each edge (Figure 1) is 100 mm on each edge, and its volume in terms of millimeters is 100 mm X 100 mm X 100 mm = 1,000,000 cubic millimeters. Thus there are one million (= 106) cubic millimeters of liquid in one liter, and one cubic millimeter of liquid = one millionth of a liter.
Another way to say "one millionth" is "micro" (designated by symbol μ). One cubic millimeter of liquid is therefore known as one "microliter" (μl) of liquid. There are one million microliters per liter, and 1,000 microliters per milliliter, i.e., 106μl per l and 103μl per ml.

B. MEASURING RELATIVELY LARGE VOLUMES
Measuring liquid volumes is a daily activity in most bioresearch laboratories. As a general rule, all solutions should be handled with care. Check in advance for possible hazards (vapors poisonous? flammable? carcinogenic potential? etc.). WEAR GLOVES AND PROTECTIVE EYEWEAR! Solutions should be poured slowly and carefully, using a funnel when necessary to prevent spillage.
Relatively large volumes (25ml or more) are measured by using various types of volumetric labware. The "metric" in "volumetric" refers to metric measurements of volume, as discussed above. Having already examined examples of labware, you will have noted that at least some beakers and erlenmeyer flasks, as well as all graduated cylinders and volumetric flasks, have volume markings on them. Indeed, they all can be used for measuring relatively large volumes, but they differ considerably in their expected margin of error.
Erlenmeyer flasks, for example, have a margin of error of + or - 5%, written right on their label. This means that if you fill such a flask to, say, the 100 ml mark, the actual volume contained in it can range from 95 ml to 105 ml. That is an unacceptable variance for most research lab volume measurements, especially those involved in preparing chemical solutions. Beakers similarly have too great an intrinsic error. Therefore, most solutions for research use are prepared either with graduated cylinders or volumetric flasks. These types of labware are carefully manufactured to reduce measurement errors.
Volumetric flasks have a smaller error than graduated cylinders, and they are used routinely when preparing solutions that have their components specified in molarity (see below). Volumetric flasks have a long narrow neck, on which a single calibration line is etched. When properly filled, the bottom of the meniscus (the air-fluid interface) touches this line. The reduced error in volumetric flasks is due in part to the narrowness of the neck. Imagine that you made an error of 1 millimeter in judging the position of the bottom of the meniscus in (a) a 100ml beaker, (b) a 100 ml graduated cylinder, and (c) a 100 ml volumetric flask. In each case the volume affected will be the height of the error (1mm in each case) X the area. This volume error will thus be a greater percentage of the total volume when the area is greatest (beaker) and the percent error will be smallest for the smallest area (volumetric flask).
Graduated cylinders, though less accurate than volumetric flasks, are more convenient because they permit measurement of a range of volumes. They are frequently used when preparing "percent solutions" or any other solutions that do not require maximum accuracy. Graduated cylinders come in various sizes (e.g., 1000ml, 500ml, 250ml, 100ml, 50ml, and even smaller. The choice of graduated cylinder is made on the basis of the volume to be measured. The smallest cylinder that can contain the desired volume should be used, because that will be the narrowest one, with the lowest percentage error (as described for volumetric flasks). For example, if you were to measure 100ml in a 1000 ml graduated cylinder, the potential percentage error would be much greater than if you used a much narrower 100ml graduated cylinder.
Glass volumetric flasks and glass graduated cylinders are marked "TC", while plastic graduated cylinders are marked "TC/TD". What does this mean? This was explained earlier, in the module on Types of Labware. To review, TC means "To Contain", and TD means "To Deliver". A glass cylinder or flask filled, say, to the 100ml mark with a watery liquid will contain 100ml, but will not deliver all of it when it is poured out. Some of the watery solution will adhere to glass, which is hydrophilic. The volume that remains behind is significant, and must be utilized in certain situations.
EXAMPLE: Suppose that you are preparing 1 liter of a watery medium that consists of several ingredients, and that one of these ingredients is 100ml of a particular sugar solution. If you fill a 100ml volumetric flask to the 100ml line with the sugar solution, and then pour it into the 1 liter volumetric flask, the sugar solution remaining in the 100ml volumetric must be rinsed out with water, and the rinse must also be added to the 1 liter volumetric. Then other ingredients can be added.
The plastic graduated cylinders say TC/TD, because the plastic is hydrophobic. A plastic graduated cylinder will deliver all of its content of watery solution (with a bit of tapping sometimes needed). The hydrophilic vs. hydrophobic nature of glass versus plastic also accounts for the fact that glass graduated cylinders have a curved meniscus, whereas the meniscus in a plastic cylinder is almost flat.
Before you prepare any solutions for research use, you must know what degree of error can be tolerated. The research sponsor or others in the laboratory should be asked. If in doubt, volumetric flasks are the safest choice.
C. A NOTE ON ERRORS
The measurement errors described above are due both to the degree of inaccuracy permitted during the manufacture of the labware involved, and the human error in judging whether a meniscus is touching a calibration line. Such errors lead to variation in the actual volume of solution measured, and can be called quantitative errors. Quantitative errors occur in any measurement process, including, for example, the weighing of chemicals. So long as no additional errors have been made in the calculation of the quantities needed or the selection of proper labware, this type of error is essentially unavoidable, and is usually tolerable in experimental work.
Quantitative errors become intolerable in cases in which a gross additional human error occurs, such as by mistakenly using a 100ml flask instead of the 1000ml one required, or weighing out 57 grams of a chemical instead of 5.7 grams because you didn't notice the decimal point.
Equally serious or even worse are qualitative errors. For example, if you should accidentally make up a culture medium using potassium chloride instead of sodium chloride, the cells or tissues exposed to it might die. If you should use a reagent storage bottle that someone has forgotten to rinse out after soaking in cleaning solution, the detergent contaminating its contents will probably ruin any experiments in which the contents are used. If you should mix up several test tubes or samples because of poor labeling, your experimental results will be erroneous. If you should write down the wrong data in your laboratory notebook because you were distracted by something or someone, your experiments will not be repeatable. A single qualitative error in the making of a stock solution of one chemical could, potentially, ruin all of your experiments (or those of others) for MONTHS!!
THE MESSAGE? BEWARE FIRST AND FOREMOST OF QUALITATIVE ERRORS; THEY ARE THE ONES THAT CAN BE MOST DEVASTATING TO YOUR HARD WORK. SECONDLY, DOUBLE-CHECK ALL CALCULATIONS IN ADVANCE SO AS TO AVOID GROSS QUANTITATIVE ERRORS.
EXERCISE #1: MEASURING VOLUMES IN A VOLUMETRIC FLASK VERSUS A GRADUATED CYLINDER.
In this exercise, you will use the electronic balance (as instructed in previous module) to weigh volumes of water that you have measured using a graduated cylinder and a volumetric flask. This will enable you to determine the weight of a given volume of water and to obtain an estimate of the error inherent in volume measurements.
Procedure:
1. Obtain a clean and absolutely dry 100ml volumetric flask and a clean 100ml glass graduated cylinder.
2. Check that the electronic balance is turned on and ready for use.
3. Place the empty volumetric flask on the electronic balance, and "tare" its weight (i.e., balance should read zero with flask on it).
4. Remove flask from balance without otherwise disturbing balance. Fill flask to the 100ml mark with deionized distilled water.
Note that accurate filling requires that the bottom of the meniscus (the curved air-water interface) must just touch the 100ml mark.
5. Place the filled flask on the balance and weigh it. Since the weight of the flask alone was previously "zeroed", the weight shown is that of the water only.
6. Record weight of the water as measurement #1, in your Tech Facility notebook.
7. Remove the flask from the balance. Using a Pasteur pipette (with bulb), withdraw several pipettes full of water (discard into sink) so that the meniscus is far down from the line.
8. Re-fill the flask to the line, re-weigh, and record weight (#2)
9. Repeat steps 6 and 7 until you have recorded ten measurements.
10. Remove the flask from the balance, and replace it with the empty 100ml glass graduated cylinder. Re-zero the balance with the cylinder on it.
11. Repeat the above procedure, obtaining ten measurements of the weight of 100ml water using the graduated cylinder.
12. Compare the data for flask versus cylinder.
(a) Add up all 10 measurements for each, and divide by 10. This gives the average weight per measurement, known in statistics as the "mean" of the measurements.
(b) Calculate the amount, plus or minus, by which each individual measurement differs from the average weight.
(c) What is the range of deviations from the mean (going from - to +) for the volumetric flask? How does it compare with the range for the graduated cylinder? The ranges here are due only to the error involved in judging the position of the meniscus. Note that a greater variation range would likely be obtained if you used ten different 100ml volumetric flasks and ten different 100ml graduated cylinders to make the measurements.
13. Pour water out of flask and cylinder (into sink). In this case, you do not need to wash them in the wash bucket, because they contained only deionized distilled water. Hang them upside-down from the labware drying rack near the sink.

D. SMALLER VOLUMES
PIPETTES:
To measure smaller volumes, other useful devices are available. In the 1 to 10 ml range, various types of pipettes (= "little pipes") are employed. Such pipettes are thin glass or plastic cylinders with a narrow tip for drawing up the solution. Calibration markings on the side indicate the volume of solution in the pipette. The volumes that these markings represent are stated on each pipette. For example, a 10 ml pipette may have 0.1ml or 0.2ml as its smallest unit marking.
Pipettes are routinely available that hold 10ml, or 5 ml, or 2 ml, or 1 ml, all with calibration subdivisions on them. The proper pipette must be chosen for the task at hand. For example, a 1ml pipette will more accurately measure 1ml than will a 5ml pipette. You should thus choose the smallest volume pipette that will do the job.
Pipettes were originally designed to be used by applying suction from the mouth. This is no longer done, for health and safety reasons. Thus, the first rule is: NEVER PIPETTE BY MOUTH! Instead, you must use one of a number of pipetting devices available.
EXERCISE #2: PIPETTE CALIBRATION MARKINGS
Obtain the box labeled "Demonstration Pipettes" from the large box labeled "LABWARE". Pick up and examine the calibration markings on a 10ml, 5ml, and 1ml pipette. Note that, as the 10ml pipette is filled from the tip, the volume it contains when the bottom of the meniscus is at the "6ml" mark is actually 4ml. The markings thus show the volume of solution that has been let out of the pipette, starting with the pipette full to the 10ml line. The same is true for the other size pipettes.
EXERCISE #3: PIPETTING
In this exercise, you will use a "suction bulb" to draw water into a pipette and deliver a measured volume into a tube.
Procedure:
1. Obtain a 10ml disposable glass pipette, a 17 ml test tube, and one of the large suction bulbs from the drawer labeled "PIPETTING BULBS". Place the tube in a test tube rack.
2. Examine the bulb. It has four areas of interest: three are marked by the letters A, S, E, and the fourth is the opening into which the pipette will be inserted. "A" stands for "air", "S" for "suction", and "E" for "expel". (See Figure 2.)
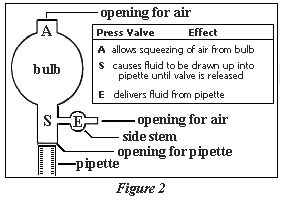 "A"
- Pressing A and squeezing the bulb empties it of air. This provides the vacuum needed to draw
liquids up the barrel of the pipette.
"A"
- Pressing A and squeezing the bulb empties it of air. This provides the vacuum needed to draw
liquids up the barrel of the pipette.
"S" - Pressing S opens a valve and applies the vacuum to the pipette causing liquids to rise up the pipette (until B is again released).
"E" - Pressing E opens a valve that bypasses the vacuum in
the bulb and causes the liquid level to drop by means of gravity. NOTE: The last few drops in the pipette tip will not be expelled by pressing E. In order to expel this aliquot, place one finger on the opening of the "side stem" and squeeze the small bulb while pressing E. This applies positive pressure to the pipette expelling any of the remaining contents.
3. Press and hold circle "A". While pressing, squeeze the bulb as much as possible, to expel all of the air from it. Release "A" and then release the bulb.
4. Insert the top of the pipette (wider end) into the bulb opening. In sterile pipettes, the top is plugged with cotton. Hold the pipette near its top while inserting, not near its middle. OTHERWISE IT MAY BREAK FROM THE PRESSURE, AND CAN INFLICT SEVERE CUTS.
5. Fill a 50ml beaker with deionized distilled water. Your objective will be to pipette 10ml of it.
6. With the bulb attached, place the tip of the pipette just deep enough into the solution to obtain the volume of solution needed. Do not hit the bottom of the beaker (or any container) with the pipette tip.
7. Press and hold "S". The liquid will start to be drawn up into the pipette. Proceed slowly. If you go to fast, you may draw the liquid up into the bulb. Draw up the water until it is slightly just above the 10ml mark, then release "S".
8. To get rid of the excess liquid, touch the tip of the pipette gently against the inside of the beaker. Press and hold "E", allowing the water to run slowly out of the pipette. Release "E" when the bottom of the meniscus reaches the 10ml mark.
9. Transfer the pipette tip into the test tube, and deliver the 10ml water into it by pressing "E" again.
10. Empty the test tube into the sink, and repeat steps 6-10, except this time, pipette 7 ml.
11. Repeat steps 6-10, for 4 ml.

MICROPIPETTES AND MICROPIPETTORS
For measuring volumes of < 1 ml, "micro"pipettes and "micro"pipettor devices are used. Micropipettes are very thin glass tubes, with a single calibration line marked on them. For use, they are attached to a device that can apply slight suction. This is used for filling to the mark and for delivery of the contained volume. Micropipettes come in specified single volume sizes, such as 100μl, 50μl, 25μl, and 10μl. Micropipettes are not used as much as they once were, due to the invention of "micropipettors" that offer the capability of measuring intermediate volumes (for example, 29μl) and make convenient use of disposable tips.
EXERCISE #4: MICROPIPETTES
From the box labeled "Demonstration
pipettes", obtain the small cylindrical container labeled "DEMONSTRATION
MICRO-
PIPETTES". Examine several micropipettes, then return them to the container and put it back in the box.
MICROPIPETTORS:
Several different brands and styles of micropipettors are available from scientific supply companies. In the Tech Facility you will use one of the most popular, known as "Pipetman" micropipettors. The Pipetman micropipettors available in the Tech Facility cover three volume ranges; 0-20μl (the "P-20"), 0-200μl (the "P-200"), and 0-1000μl (the "P-1000"), as designated by a label. You must choose the correct one for the volume to be measured. The lowest end of each volume range is subject to the greatest percentage error. Thus, if you wanted to pipette 10μl, you would choose the P-20 rather than the P-200, and the P-1000 would be even worse.
For accuracy, you must stay within the calibrated range of each micropipettor. The volume setting is determined by rotation of the calibrated volume adjustment (stroke) knob near the top of the micropipettor. Although it is possible to set the volume outside of the range to some extent, the device is likely to be inaccurate for those volumes.
The following table shows the ranges of the Pipetman micropipettors in the Tech Facility.
|
PIPETMAN |
PIPETTOR RANGE |
ACCURATE RANGE |
|
P-20 |
0 - 20 μl |
2 - 20 μl |
|
P-200 |
0 - 200 μl |
50 - 200 μl |
|
P-1000 |
0 - 1000 μl |
100 - 1000 μl |
 Micropipettors make use of disposable
plastic tips that attach to their ends.
It is these tips that actually contain the measured volume of
solution. Tip colors have been standardized
for certain volume ranges: yellow ones are used for the P-20 and P-200, and
blue ones for the P-1000. The tips come
either in special racks in boxes, in which they are arranged upright in rows,
or else in "bulk" packages (bags) which are less expensive. Bulk-pack tips are usually then transferred
to the racks manually for convenient use.
In some laboratories, tips in racks are sterilized before use in an
autoclave, a device that applies moist heat (steam under pressure) at a
temperature of 1210C.
Micropipettors make use of disposable
plastic tips that attach to their ends.
It is these tips that actually contain the measured volume of
solution. Tip colors have been standardized
for certain volume ranges: yellow ones are used for the P-20 and P-200, and
blue ones for the P-1000. The tips come
either in special racks in boxes, in which they are arranged upright in rows,
or else in "bulk" packages (bags) which are less expensive. Bulk-pack tips are usually then transferred
to the racks manually for convenient use.
In some laboratories, tips in racks are sterilized before use in an
autoclave, a device that applies moist heat (steam under pressure) at a
temperature of 1210C.
Refer to the diagram of the "Pipetman" micro-pipettor in Figure 3 for locations of controls and for the correct grip. This grip is important to ensure proper use and to avoid accidental ejection of the tip.
Please handle these devices carefully. They are expensive and have many small internal parts, and since they work with such small volume units (1μl = 10-6 liters), they must be used correctly. Never open or remove any part of the Pipetman!
EXERCISE
#5: EXAMINATION OF THE PIPETMAN MICROPIPETTOR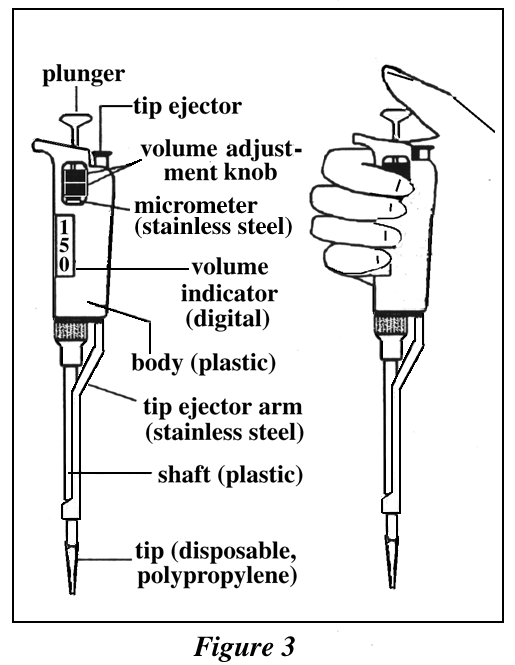
Procedure
1. Examine the P-1000 Pipetman (the number is on the top of the plunger). Identify its parts with help of Figure 3. Locate the tip ejector.
2. Pick up the Pipetman and practice gripping it properly.
3. Locate the volume adjustment knob.
4. Test the plunger, which has two distinct stops when depressed. The first stop is used for drawing liquid up into the tip, i.e., the plunger is moved to the first stop and the tip is then immersed in the solution. Move the plunger to the first stop, then let it return to its starting position (by slowly releasing it). This simulates the filling procedure.
5. The second stop (plunger pressed all the way down) is used to dispense measured volumes from the pipettor. Move the plunger to the second stop to simulate the emptying procedure, then let it return slowly to its starting position.
EXERCISE #6: USING THE P-1000 TO MEASURE VOLUMES.
In this exercise you will use the P-1000 micropipettor to measure 600μl of water and deliver it into a microcentrifuge tube.
Procedure:
1. Obtain a Pipetman P-1000 (needed for this volume), two microfuge tubes, and a closed rack of tips of proper size (what color?). Keep box of tips closed until just before tip is needed (to keep them clean). Fill one microfuge tube with deionized distilled water, and set both tubes into a microfuge tube rack.
2. To adjust volume setting, turn the volume adjustment knob 1/3 revolution above the desired setting (600μl, then slowly turn it back down until 600μl appears on the digital volume indicator. According to the manufacturer, this procedure helps prevent mechanical backlash that can affect accuracy. Always dial down to the desired volume.
3. Attach a new disposable tip to the pipette shaft by opening the tip rack on one side and pressing shaft into tip firmly. Make sure you get a positive seal. Close the box to maintain cleanliness (or sometimes sterility) of the rest of the tips in the box.
4. Depress the plunger to the first stop. This is the calibrated part of the stroke.
5. Hold the Pipetman vertically and immerse the tip into the microfuge tube containing the water. Insert it to a depth of no more than 3-4 mm, so that excess liquid does not adhere to the outside of the tip.
6. Allow the push button to return slowly to the up position.
"Never let the plunger snap
up"!
7. Wait a moment to ensure that the full volume of liquid is drawn up into the tip. Make sure there are no air bubbles in the tip. If there are, you must repeat steps 4, 5, and 6.
8. Once the liquid is in the tip, withdraw the tip from the water. Make sure you continue to hold the Pipetman vertically.
9. To dispense sample, touch the tip end against the side wall of the receiving vessel (empty microfuge tube) and depress the plunger slowly to the first stop. Wait 1-2 seconds, and then press the plunger to the second stop expelling any residual liquid in the tip.
10. With the plunger fully depressed, withdraw the tip from the receiving vessel, sliding upward against the side wall of the vessel <<why??>>. Allow the plunger to return slowly to the up position.
11. Discard the disposable tip directly into a red hazardous waste container by pressing the tip ejector button.
12. Repeat steps 2-11, except measuring 850 μl of water.
NOTES:
(a) Always use a new pipette tip for each new sample.
(b) When pipetting a very small volume (ie: less than 5 ul), it is useful to dispense sample directly into its final receiving vessel, to avoid further loss during transfer.
(c) It is possible to mix small volumes of liquids by repeated micropipetting. This is achieved by pressing the plunger up and down several times to mix the solutions.
EXERCISE #7: MEASUREMENT OF VOLUMES BY WEIGHT
MATERIALS:
Electronic balance
P1000 Pipetman
pipette tips
snap-cap microfuge tubes
small beaker (50 ml)
Procedure:
PART I:
1. Turn electronic balance "ON", (with lid of balance closed).
2. Press "TARE" to zero balance = 0.000 gm.
3. Raise lid of balance.
4. Place snap-cap microfuge tube on balance.
5. Close lid.
6. Wait a few seconds to allow measurement to stabilize.
7. Record reading in Tech. Facility notebook.
8. Fill small beaker with water.
9. Set P1000 Pipetman to 500 ul.
Insert pipette tip.
Draw up set volume of water.
10. Open lid of balance.
Place the water into the microfuge tube and snap top close.
11. Return tube to balance and close lid.
12. Dispose of pipette tip (into red hazardous waste container).
13. Let reading stabilize.
14. Record reading of second measurement.
15. To obtain final weight of 500 ul water,
subtract second result from the first, and then record this result in notebook.
16. Repeat this procedure again.
Do the final results match exactly?
17. Remove microfuge tube from the weighing platform and discard
into hazardous waste receptacle.
18. Turn electronic balance off.
19. Check to see that the weighing platform is clean and lid of
balance is lowered.
20. Clean (up) area around balance.
Procedure:
PART II:
1. Turn electronic balance "ON".
2. Raise lid of balance.
3. Place snap-cap microfuge tube on balance.
4. Close lid.
5. Press "TARE" to zero balance = 0.000 gm.
6. Fill small beaker with water.
7. Set P1000 Pipetman to 500 ul.
Insert pipette.
Draw up set volume of water.
8. Open lid of balance.
Place the water into the microfuge tube and snap top closed.
9. Return tube to balance and close lid.
10. Wait a few seconds to allow measurement to stabilize.
11. Record result of final volume in Tech Facility notebook.
12. Repeat this procedure again.
Do the final results match exactly?
13. Follow clean-up procedures, steps 17-20, in Part I of
Exercise 7.
Compare the results obtained after performing PARTS I and II of Exercise 7. If the results match, then your technique is good. If there is a very large difference between the measurements, then your technique needs refinement and the Exercises should be repeated.
EXERCISE #8: USING PIPETTE PUMP

In this exercise you will use a “pipette pump” to draw water into a
pipette and deliver a measured volume into a test tube.
Pipette pumps are commonly employed to deliver relatively large volumes
with moderate accuracy.
Procedure:
1.
Obtain a 10ml and a 1 ml disposable pipette from the drawer labeled
“disposable pipettes”, a large test tube, and both pipette pumps from the
drawer labeled “Pipetting bulbs and pumps”.
Place the test tube in a test tube rack.
2.
Examine the pipette pumps. The
pipette pumps come in color-coded sizes. The
smaller blue one fits pipettes up to 2 ml, and the larger green one to 10 ml.
3.
WITHOUT INSERTING A PIPETTE, hold one of the pipette pumps in the palm of your
hand, so that it feels comfortable. Your
thumb should rest on the operating wheel.
4.
Try turning the wheel with your thumb. For suction and pipette filling, the
wheel is turned with your thumb moving downward.
To expel fluid it is turned in the opposite direction.
For rapid emptying, press down the plunger top.
First, practice doing these movements several times without a pipette.
5.
Try inserting a pipette. To do so,
HOLD THE PIPETTE AS CLOSE AS POSSIBLE TO ITS UPPER (NON-TIP) END and to the
pipette pump chuck, and keep holding it there during insertion.
Insert it into the chuck with slight pressure and a twist, assuring a
secure fit.
AGAIN,NOTE:
EXTREME CARE SHOULD BE TAKEN WHEN
INSERTING DISPOSABLE GLASS OR PLASTIC PIPETTES BECAUSE OF THE POSSIBILITY OF
SHATTERING. HOLD THE PIPETTE AS
CLOSE TO ITS UPPER END AND THE CHUCK AS POSSIBLE DURING INSERTION, AND INSERT
SLOWLY.
6.
Try removing the pipette. To do so,
again hold it adjacent to the chuck, and loosen it with a slight twist and pull.
7.
Obtain a 150 ml beaker, with about 50ml deionized water in it.
8.
Using the green 10 ml pump with 10ml pipette attached, place pipette tip into
the water and turn the pump wheel with your thumb.
Draw 10ml water into the pipette. Remove any hanging drop by touching it
to inside of beaker.
9.
Place the pipette tip into the test tube, and expel the water by pressing down
on the plunger top. Empty the tube into the sink.
10.
Repeat steps 8 and 9, but this time expel only 5 ml water into the tube by
turning the thumb wheel until you reach the 5 ml mark on the pipette.
Empty the tube into the sink.
11.
Using the blue 2ml pump, attach a 1 ml pipette and draw 1 ml water into the
pipette via the thumb wheel. Remove hanging drop, if any, as before. Transfer
the water into the test tube by pressing down on the plunger top.
12.
Repeat step 11, but this time expel only 0.5ml water into the tube by turning
wheel with your thumb until you reach the 0.5 ml pipette mark.
Empty the tube into the sink.
13.
Repeat steps 11 and 12, except this time for 0.3 ml.
14.
Empty all water into the sink. Dispose
of pipets and test tube by placing them into the sharps container.
Return pipette pumps to proper storage drawer.
PIPETMAN PIPETTOR SUPPLEMENT
EXERCISE #S-1
Go to the Pipetman pipettor stand and examine the P-1000,
P-200 and P-20 again. Note that the plunger button of each Pipetman is marked P-1000, P-200 or P-20 indicating what maximum volume in μl that Pipetman can measure. Also note that the Digital Volume Indicator on all three has 3 positions. This displays tenths, ones, tens, hundreds, or even a thousand μl depending on which Pipetman is used.
PIPETTOR RANGE AND ACCURACY
Because different Pipetman pipettors are designed to measure volumes in different ranges, they are also different in terms of accuracy. For example, if you were to measure 1μl with all three (P-1000, P-200 and P-20), how accurate would the 1μl obtained by the P-1000 or the P-200 be? Obviously, it would be quite inaccurate compared with the 1μl obtained using the P-20 (or - even better - a P-1 if we had one!).
EXERCISE #S-2
(1) Take the P-20 from the Pipetman stand. It has three display spaces on its Digital Volume Indicator, but it measures only up to 20μl.
Q: What does each of the display spaces of the P-20 show?
A: The top space on the indicator reads tens of microliters. The middle space reads ones, and the bottom space reads tenths. Note also, that only the tenths are numbered in red.
This is the Tech Facility's most accurate Pipetman for small volumes (there are others made that are more accurate though). For example, if you want to measure 15.3μl, the P-20 display should show:
|
1 |
|
5 |
|
3 |
(2) Put the P-20 back and examine the P-1000. It can measure up to 1000μl, yet its display also has 3 positions.
Q: Which space shows thousands, hundreds, etc. of μl?
Q: Can you use the P-1000 to measure 5μl accurately?
Q: Why is the top place on the Digital Volume Display numbered in red?
Q: What would the Digital Volume Display show if you used a P-1000 to measure out 250μl? (To check your answers turn to the end of the last page of this supplement.)
(3) Put the P-1000 back and examine the P-200. Note that it also has 3 display places on the Digital Volume Indicator. Since the P-200 measures from 1 to 200μl, the top display place indicates hundreds of μl (it can show only 0, 1 or 2), the middle of the display place indicates tens of μl, and the bottom place indicates ones of μl.
EXAMPLE: IF THE P-200 display shows:
|
1 |
|
2 |
|
5 |
that means you will measure 125μl.
SUMMARY: PIPETMAN PIPETTOR MEASURING TIPS
1) Always think about which Pipetman you should use to achieve the most accurate measurement of the volume needed. Before setting the Volume Adjustment Knob, look at the top of the Plunger Button to see which Pipetman you are using.
2) Always double-check that the Digital Volume Display is really set to measure the volume needed, and that it is relevant to the type of Pipetman being used. Before adjusting the Digital Volume Display Knob, write down in your lab notebook what Pipetman you are using and what your Digital Volume Display should show. This will enable you to check your calculations in case your experiment does not work out as expected.
The most common mistake is to look at the number of display spaces on the Digital Volume Display while forgetting which Pipetman is being used. For example, one might need to measure 50μl. Grabbing the P-1000 or P-20 (instead of the P-200) and setting the dial to:
|
0 |
|
5 |
|
0 |
will yield a volume of 500μl on the P-1000 Pipetman. The same setting on the P-20 would yield 5μl! If, during an experiment, you were to add 500μl or 5μl while thinking that you added 50μ, your experiment will no doubt be ruined, and you may not be able to find out why very easily.
EXERCISE
#S-3: CHOOSING THE CORRECT PIPETMAN AND VOLUME
DISPLAY
EXAMPLE: To measure 100μl, use the P-200 and a Digital Volume Display of:
|
1 |
|
0 |
|
0 |
What Pipetman would you use (P-1000? P-200? P-20?) and what would its Digital Volume Display if you needed to measure each of the following volumes?
12.5μl, 200μl, 25μl, 650μl, 666μl, 970μl, 32.7μl, 1500μl
EXERCISE #S-4: WHAT VOLUME IS BEING MEASURED?
![]() The charts below show the type of Pipetman
being used and its Digital Volume Indicator setting. What volume is being measured in each case?
The charts below show the type of Pipetman
being used and its Digital Volume Indicator setting. What volume is being measured in each case?
¯ TYPE ¯ ¯ SETTINGS ¯
|
P-1000 |
0 |
1 |
0 |
0 |
|
|
2 |
0 |
0 |
7 |
|
|
5 |
0 |
7 |
0 |
¯ TYPE ¯ ¯ ¯ SETTINGS ¯ ¯
|
P-200 |
1 |
0 |
0 |
1 |
1 |
0 |
|
|
2 |
1 |
2 |
0 |
9 |
9 |
|
|
0 |
2 |
1 |
2 |
9 |
9 |
¯ TYPE ¯ ¯ ¯ ¯ SETTINGS ¯ ¯ ¯
|
P-20 |
0 |
2 |
1 |
0 |
0 |
1 |
1 |
|
|
2 |
0 |
9 |
0 |
5 |
3 |
0 |
|
|
0 |
0 |
9 |
1 |
7 |
4 |
6 |
ANSWERS TO Q's:
Q: Which space shows thousands, hundreds, etc. of μl?
A: Top = thousands; middle = hundreds; bottom = tens. There is no space for ones! The tiny subdivisions at the bottom of the bottom space represent two μl each, but are relatively inaccurate.
Q: Can you use the P-1000 to measure 5μl accurately?
A: NO! Those tiny subdivisions are inaccurate for that purpose; you should use the P-20!
Q: Why is the top place on the Digital Volume Display numbered in red?
A: The red indicates measurement in the thousand μl position; in this position the space shows either a 1 or a zero.
Q: What would the Digital Volume Display show if you used a
P-1000 to measure out 250μl?
A:
|
0 |
|
2 |
|
5 |